Friday, June 30, 2017

Creating Digital Overlays

A while back I shared with you how to create a digital overlay using a stamp.  Now I want to share how you can make your own overlay from a patterned paper.  This is a great way to increase your digital stash.
 
Open a large patterned paper in Photoshop Elements and make a duplicate copy.
Select Enhance>Convert to Black and White.
Using your Quick Select tool, select a sample area of what you'd like to remove.
 Select>Similar and cut or delete.
New Adjustment Layer>Threshold and use slider until image is all black.
Merge and save as a .png file.
 
Club Scrap digital papers, frame, stitching and word art. Charlize Creations jeweled cluster.


Thursday, June 29, 2017

Blueprints Meets Oxide Inks

Two of my favorite combinations! Tim Holtz's Blueprint stamps and his Oxide Inks!  I'm in love with how the oxide inks show up on dark cardstock.  All I did here for the backdrop was mush my ink pad onto my craft sheet, add a few drops of water to the ink and flick the ink onto a cardstock panel.   The cupcake was an oxide ink practice piece that I stamped.  I did add a few highlights with Copic markers, cut out the image and used foam squares to give it lift.
Club Scrap papers and ribbon. Tim Holtz Oxide Inks and stamp. 

Wednesday, June 28, 2017

Pattern Play Blog Hop

Welcome to the Pattern Play Blog Hop brought to you by Club Scrap.  Each month the talented Club Scrap owner, employees and members present a project, card or layout using the monthly featured collection. The  purpose of the blog hop is to demonstrate the beauty of paper and digital crafts.

If you just happened on the blog hop today because you're a regular reader of my blog, and you'd like to view the entire hop, you can  start back at Club Scrap. If you're already hopping and linked to me from the talented Kelly's blog, you're in the right spot. 

Today each member is pulling inspiration from the Pattern Play collection. This kit features a black/white/gray color palette complemented by a beautiful splash of lime green.
 
I have two upcoming adventures in my life. I start a Winemaking class this week that'll take me through the summer.  Yeah me! I need to start thinking what my second career will be in a few years and you know I'm a planner.  My second adventure will be a trip to Ireland and Iceland next April.  Iceland has been on my bucket list for awhile and I'm super excited.
 
Having the OCD personality that I do, I need a notebook for each adventure. However, I have found that I never really fill up an entire notebook in the past. So I took an idea from Karen and cut a composition notebook in half.  I love these graph composition notebooks from Retreat 2013 and still have a few handy.
 
1. Trim a notebook in half with a craft knife.

2. Cover notebook with papers using bookbinding glue.  
3. Round corners with a corner chomper.
4. Decorate as desired.
All products by Club Scrap.
Here's a tutorial on how to make this adorable double bow. 

Club Scrap papers, tags and feather. Tim Holtz numbers. Doodlebug doily. 

Thank you for hoping with us today! Please continue on to see what Tina has created with this collection.

Here's more composition notebook inspiration.


Tuesday, June 27, 2017

Sac Town

The best way to learn about your city is to have visitors.  Tricia and Karen came to Sacramento last October for the Scrapbook Expo.  However Karen was the one who knew about the Underground Tasting Room. I used to work in Old Town and never knew it existed. We ate at some AMAZING restaurants that I had never been to.  I think Tracey and I had just as much fun exploring our city as they did!
 
I couldn't find the right papers for these photos until Pattern Play came along. I stole this layout straight from the ALSB instructions, with a few changes of course. 
Club Scrap papers, ribbon and stamps. Paper Smooches wine die. Thickers alphabet.
 

Monday, June 26, 2017

Masculine Blueprint Birthday

Recognize this paper?  Yep...it was from that background I created with oxide inks and initially hated it. I've been creating some masculine cards lately and this paper is perfect for them. I thought I'd keep the card simple with all the colors and lines. I stamped the balloon on a separate oxide ink panel, cut it out and mounted it with foam tape. What says "manly" more than twine?!
Club Scrap papers and greeting. Tim Holtz Oxide inks and balloon stamp.
 
Created for Just For Fun Rubber Stamp's For the Guys Challenge
 

Friday, June 23, 2017

One Layer Layout

Welcome to June's Artist Team Blog Hop brought to you by Club Scrap. Each month the team presents a themed challenge or technique. The  purpose of the blog hop is to demonstrate the beauty of paper crafts.  Today we'll be showing you ideas for one layer projects. 

If you just happened on the blog hop today because you're a regular reader of my blog, and you'd like to view the entire hop, you can start back at Club Scrap. If you're already hopping and linked to me from Tina's Blog, you're in the right spot.
 
One layer layouts or cards are a little difficult for me. I like to pile things on my layouts.  Mostly because I have a room full of scrapbook stuff. After creating panels and cards with my new oxide inks I thought...why not try it on a layout!

So let's get started.
 
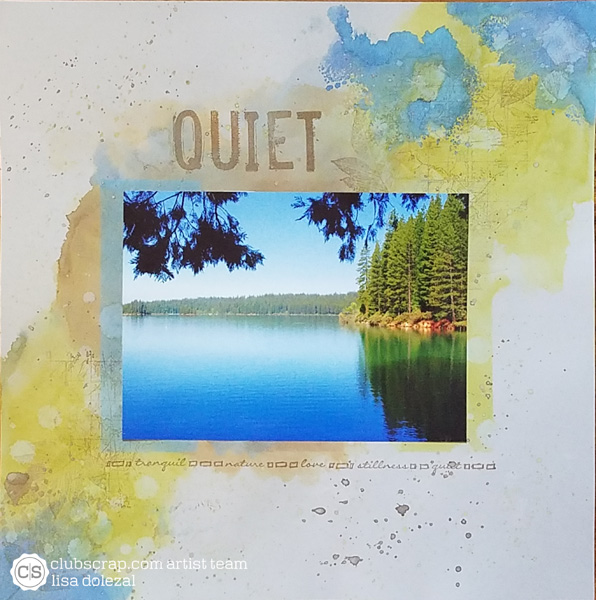
1. Create an area for your photo "mat" by taping off an area slightly larger than the photo and ink the inside with blue, brown and green. 
 
2. Add color to the rest of the layout by smooshing blue and green inks on a craft mat, add water and start pressing the paper into the ink.  
 
3. Dry with a heat gun and repeat the process until you're satisfied.
 
4. Add drops of water to the paper and let sit a few seconds before heat setting. 
 
5. Add stamping.  I used the map from Adirondacks but I only partially inked the map trying to avoid major edges and lines. I stamped leaves throughout the inked area stamping the first image on scratch paper and using the second stamping for the layout to give me a softer lighter image.
 
6. Flick ink on layout using a water brush and ink or gelatos.  
 
 Club Scrap paper and stamps. Tim Holtz Oxide inks.
 
Thank you for hoping with us today! Please continue on to see what amazing one-layer project Kelly has created.

Thursday, June 22, 2017

Climb This Mountain

I was attempting to create a background with Oxide inks for the One Layer Layout challenge tomorrow and totally did not like how this paper turned out for my photo. So I set it aside hoping I could rescue it somehow.  When I was creating a card for the Paper Smooches Manly Challenge I thought this was a perfect match! I love how things work out sometimes.
I chose to do this yellow ribbon manly card for several reasons. Yellow represents bladder cancer which is a cancer that affects many firefighters, some I work closely with.  I lost a friend and great man to bladder cancer. Miss you Peet!

Paper Smooches stamps. Copic markers. Club Scrap paper and ribbon.

Paper Smooches Hope stamp set
Paper Smooches Happy Travels stamp set