Showing posts with label Techniques. Show all posts

Thursday, August 6, 2020

ATC Mini Holder


Club Scrap is hosting a new challenge this month: Make it Mini. We're challenging you to create projects or pages half the size from their original.
         
I recently joined an ATC swap in the Club Scrap Chat group on Facebook. An ATC is an Artist Training Card measuring 2.5" x 3.5".  I've accumulated dozens over my crafting years and love to use them on my scrapbook pages and cards.  Currently I have them in a binder but I want to be able to display them in my craft room.  

I took the directions from the Club Scrap Adobe Mini Magazine holder and made it even smaller.
Score a 10 1/2" x 12" sheet of cardstock vertically at 3", 6 1/2" and 10".  
 
Score horizontally at 3", 4 1/2", 7 1/2" and 9". 
 
Trim vertically with the 1/2" score mark to the right at 7" and 3 1/2". 
 
This will give you three equal pieces for the boxes.
 
Scored lines are in black.
Draw a line horizontally 2" up from the bottom on both left and right flaps. 


Using a craft knife, trim as pictured below.  

Fold up along the 1/2" scored line and fold in the edges to create a box. 

Adhere 3" end flaps together.  Continue with the remaining boxes. 


Line up the 3 boxes side by side and adhere the middle sides together to create one piece.

Wrap a 1 1/2" x 9 1/2" piece of book board with cardstock to create a solid base.

Adhere bottom flaps to base.


Decorate front as desired. 

 
We would love to see your Make it Minis. Visit the Facebook Chat Group 08/20 Technique Challenge post to upload completed artwork in the comments section. 
Original Club Scrap Stamper's Project: Mini Magazine Holder.

Saturday, May 30, 2020

Mermaids Only

Color Throwdown is hosting Color Challenge #595 consisting of black, teal and white. To escape the heat this week I've been making cards with  my art orphans.  This background is made with black and white nail polish using a marbling technique. Each panel is a glorious surprise when you pull it from the water. 

Club Scrap papers and stamp. Elizabeth Craft Designs stitched die. 


Wednesday, May 20, 2020

Let Your Weird Light Shine

The Sisterhood of Snarky Stampers is hosting a Yellow Challenge. It's been awhile since I've created  something for to the Sisterhood and was excited to be inspired by this new snarky challenge.

The background was made using a nail polish marbling technique. 

Club Scrap papers and stamp. Sizzix die cuts. American Craft twine.

More art inspiration using nail polish:
Nail Polish Marbling
Hello, You
Valentine Marbling


Friday, February 7, 2020

Hello, You

 Freshly Made Sketches is hosting sketch challenge #421, a clean and fresh card challenge.  Recently I created a pile of backgrounds using a nail polish marbling technique I've shown before.  The goal was to recreate a faux turquoise look for Club Scrap's February Technique Challenge. I tried several different color combos and love the black nail polish on turquoise paper panels.  You'll be seeing more of these this month.

How adorable is that little tassel?! 

All products by Club Scrap.

Thursday, January 31, 2019

Valentine Marbling

I had a blast creating backgrounds using the nail polish marbling technique that Julie demonstrated last summer.  I thought these colors were perfect for Valentine's day.  The backgrounds for the poinsettia lined flowers were stamped on an art panel created by using glossy photo paper and color bursts. You can view the instructions on the Too much of a good thing blog posting. 

Just for Fun stamps and sentiment. Club Scrap papers and acrylic dots. Prima flowers.

Sunday, September 16, 2018

Inked Shadows

Happy Sunday! 

September's technique challenge over at Club Scrap is to create shadowing around your stamped images with ink. 

Start by stamping your image on your art panel and a second stamped image on your masking paper.  Trim the image to create a mask. Line up the mask over your stamped image and apply ink lightly around the mask.  Color stamped images. Trim finished panel down to card size and add embellishments. 


I'm finally getting around to playing with my Club Scrap Tapestry card collection. I adore the round metal frames that come with this kit! Stamped images are from Moroccan Spice.  

Club Scrap papers, stamp, ribbon and metal and jewel. Paper Smooches sentiment stamp. Copic markers. 

Now, it’s your turn!  Link your Inked Shadows artwork for a chance to win a prize from Club Scrap! Simply add your image to the Linky Party (please caption artwork with your first name and last name’s initial) below between now and September 30, 2018.

Friday, July 20, 2018

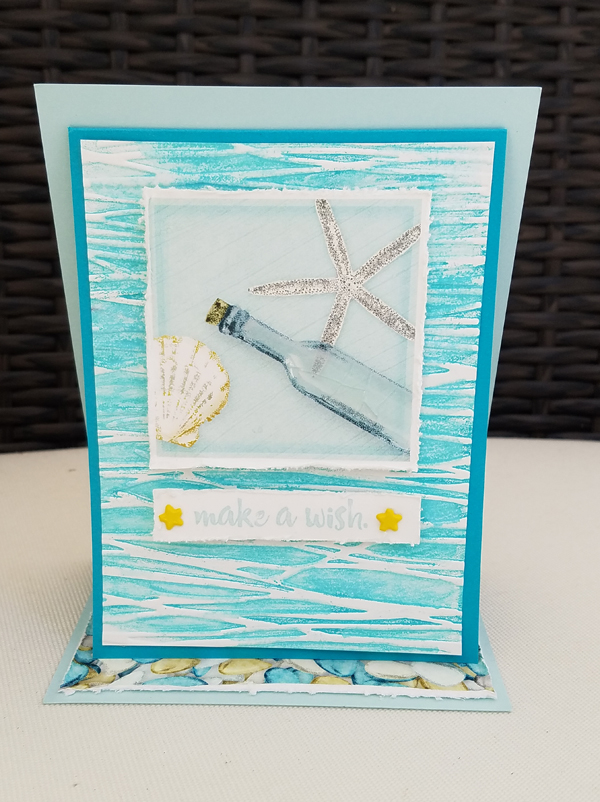
Beach Scenes

Need ideas for creating beach scenes?  Club Scrap is hosting a Beachy Background challenge. Link up your ideas and projects for a chance to win a Club Scrap gift certificate. 

With this background I inked the flat surface of an embossing folder with distress oxide inks before embossing the white panel.  I then used a water brush to blend the ink.  The "sand" is stamped but the ink slowly disappeared as it dried. 

The bottle is stamped onto clear acetate with Staz-On ink. Add a green tint to the bottle with a Copic marker.  Wrap the neck of the bottle with brown twine. Stamp the message, tear and adhere so the bottle will be resting on top. Adhere the bottle with bookbinding glue. 

Stamp the starfish on turquoise paper, fussy cut and add Nuvo Crystal drops to add depth and glitter. 

Club Scrap papers, stamps and charm. Cuttlebug embossing folder. Copics marker. 


Have a fabulous weekend! 

Wednesday, July 18, 2018

Helpful Tips

I was honored to be Club Scrap's Guest Artist this month showcasing the beautiful Sea Breeze card collection. You can see these fun beach themed cards in their entirety hereI wanted to share a few helpful tips and tricks I've learned in my crafting adventures. 

1. When adhering embossed panels use Scor-tape. This double sided tape is super strong.  You can push the tape into the embossed areas for better adhering. 
2. Edge your fussy cut images with a marker.  This give the image sharper edges. 
3. Who doesn't have sticker sheets where all the vowels are gone? I use the left over stickers for adhering wrapped ribbon ends to the back of panels. 
4. I buy adhesive foam sheets in bulk and cut them to fit the panel I intend to elevate. Try to use similar colors as your project card, at certain angles the color will show. 
5. Add depth and shine to small stamped images or die cuts with Nuvo Crystal drops using a needle-tip applicator
Paper Smooches "Hope" die. Club Scrap stamp. Impression Obsession sunburst stamp.

6. Ink the inside flat surface of an embossing folder prior to embossing your paper. Use a water brush to distribute ink for a softer watercolor look. 

Club Scrap papers, tags. Making Memories star brads. Tonic Nuvo drops. Cuttlebug embossing folder.

Hopefully you found some of these tips and tricks helpful. 
Have a fabulous day!


Friday, June 15, 2018

Nail Polish Marbling

I love learning new crafting techniques.  This month's Club Scrap technique challenge took me by surprise.  The steps are so easy resulting in spectacular marbling art panels.  All you need is nail polish, water and a container. You can see detailed instructions on the Club Scrap blog

1. Fill a small container with water. I used a Dollar Tree plastic sandwich container. 
2. Add drops of nail polish.  I actually just poured in colors of my favorite Packer nail polish.
3. Swirl with a bamboo skewer. 
4. Submerge an art panel in the water and paint.
5. Remove panel with tweezers and set aside to dry.

Here's the fabulous panels.  I kept the card designs simple to show off the marbling. 

Club Scrap papers, ribbon and stamp. EK Success punch.
Spellbinders die
Recollections tags, American Craft twine. Nuvo crystal drops. Club Scrap stamp.
Club Scrap papers and stamp. 
Club Scrap papers, stamp and white doily. Cuttlebug black doily. 
Club Scrap papers and stamp. Nuvo crystal drops. 
Would you like a chance to win a Club Scrap gift certificate? Create a marbled background add them to pages, cards or projects. Simply link up your artwork by June 30. 

Tuesday, May 22, 2018

Wreath Building

Club Scrap's technique challenge for May is to build wreaths from your stamps or stencils. I probably practiced this wreath about a dozen times.  My wreaths kept looking like someone ran over it.  :)  I know there are technical ways to stamp a wreath but I wanted to free hand it, no stamp positioner or Misti.
 
I created this wreath with a fern stamp from Club Scrap's Spring Chorus.  I stamped it three times in a "circle" and stamped it again to fill in the empty areas.
 
Club Scrap papers and stamps. Nuvo drops. American Craft twine.

Club Scrap fern stamp

Thursday, April 12, 2018

Be Different

Club Scrap is challenging its members to create their own Shibori artwork with tissue papers. This Japanese dye technique uses different folds and twists to create patterns on cloth. Today I'm playing with re-inkers and tissue paper. Julie gives a great tutorial on the Club Scrap blog.
 
Using the re-inkers I had on hand and folded tissue paper, I created these background Shibori panels. 
I then adhered the tissue to manila tags using bookbinding glue to make the panels more sturdy.
Time to create cards with the gorgeous panels.
 
This blue panel was created using Color Burst powders dissolved in alcohol.


If you'd like to join the challenge for a chance to win a Club Scrap gift certificate, enter your artwork via the Linky party on the website. 


Friday, March 2, 2018

Chalk Paint Backgrounds

I was looking for a creative way to use my chalk paints.  One of my friends posted a link to a video demonstrating how to use the chalks paints to create backgrounds.  This works perfect for the chalk paints since they dry so fast.
 
Start with just a small amount of paint on a craft sheet and coat your brayer.
Apply paint to your white background sheet.  This dries super fast.  Keep adding colors until you're happy with the background.
Allow to completely dry and then cut into panels.
 
Club Scrap papers, chalk paint, enamel dots. Elizabeth Craft designs heart die. American Craft ribbon. Teresa Collins tags. 
Club Scrap papers, chalk paint, ribbon and punch. Elizabeth Craft designs stitched die. Paper Smooches stamps.
Club Scrap papers, chalk paint, tab punch, ribbon and tag. Queen & Co. pearls.
Club Scrap papers, chalk paint and ribbon. Teresa Collins tags.
Club Scrap papers, chalk paint and ribbon Elizabeth Craft designs heart die. Teresa Collins tags.  Martha Stewart punch.

Monday, February 19, 2018

February Stencil Technique

Happy Monday!
February's technique challenge over at Club Scrap demonstrates how to brush on ink when using your stencils. I've been hearing about this interesting ink application but haven't gotten around to it. I love the softness the brushes create.
 
1. Using a Dollar Tree make up brush apply white ink to the panel using a  stencil.
2. Carefully remove stencil and dust a metallic Pan Pastel directly to the inked area.
3. Buff away excess powder with a dry cloth.

I saved this "Special You" silver tag from a birthday gift I received. 
I stamped this "Crazy" quote on a panel and was really too lazy to heat set the white ink so I dusted silver Pan Pastel on the stamped image and buffed it. I was surprised and thankful it didn't smear and set instantly.
 If you'd like to join us in the linky party for a Club Scrap gift certificate, please add your stencil creation at the bottom of the Club Scrap blog post.
Have a fabulous day!