Showing posts with label Garden Shed. Show all posts

Friday, April 7, 2017

Felt Backgrounds

I came across these rolls of felt ribbon that I purchased probably 10 years ago.
I think I've only used them once or twice as a wide border on layouts.
I decided to trim them into backgrounds and add some embellishments.

Club Scrap paper and tags. Martha Stewart felt. American Crafts twine. K&Co. butterfly. 
Club Scrap paper and tags. Martha Stewart felt. American Crafts twine. K&Co. butterfly.
Club Scrap paper and tags. Martha Stewart felt. American Crafts twine. Nuvo drops.


Wednesday, September 28, 2016

Garden Shed Blog Hop


Welcome to the Club Scrap Garden Shed Blog Hop. Join us on the hop to see what this gifted group of ladies have created using this beautiful collection.  If you've arrived here from the very talented Tina's blog you're in the right spot. If not, make sure you start at the beginning to see what Karen has created for you.
 
I came across a cute gift set on Pinterest while searching for Garden Shed ideas. I thought this would be a perfect opportunity to create a birthday gift for a friend who's moving into a new home.

First thing I did was break out the envelope punch board and created 3 seed packets.


Stamp the front of the packets. Fill with seeds and seal.
 

Next, create three small bags. Trim the top of bags with fun edged scissors.
I actually took apart a small bag I had to create my own template.
 
 
Stamp front of bags. Stencil words onto plant stakes.
Wrap with twine and tie.  


I lined the pockets with trimmed dictionary pages of plants or bugs to hold small thyme sprigs.


Fill pot with seeds, bags and sprigs. Wrap with ribbon.


Thank you for joining us today. Please continue on to see what spectacular project Donna has created for you.

Monday, September 26, 2016

Faux Wood

Happy Monday!
 
 
I hope you enjoyed the Artist Team Blog Hop last Friday. Since I love being outdoors I tend to find myself using lots of wood and natural embellishments. Today I wanted to share how I made my faux wood paper.
 
 
Create hot glue lines and "V"s on a cardstock mat. 
 
 
Turn paper over and score every 1/4 inch.
 
 
Turn paper back over with glue side up and begin rubbing distress inks.
 
 
 I used three different browns.
Spritz with water to blend.
 
 
Finished panel
 
 
I like to make several panels at once since I'm making a mess anyways.
You can make the browns as dark or light as you want. You're the boss!
 
Club Scrap papers, tags. Want 2 Scrap pearls. Tim Holtz distress inks. 


Friday, September 23, 2016

Into the Woods

Welcome to the Club Scrap Artist Team Blog Hop.  We're finally reaching one of my favorite times of the year! I love being outdoors when the air is cool and crisp! So what a better way to help convey the outdoor theme than a wood challenge. Join us on the hop to see what this gifted team has created for this event.  If you've arrived here from the very talented Donna's blog you're in the right spot. If you'd like to start at the beginning head over to Club Scrap see what Karen has created for you. 

One of my good friends got married on the beach in a small ceremony. She had some beautiful and special photos that I wanted to display.  Knowing that this layout was going into a shadow box frame allowed me to use some larger embellishments.  Driftwood was an ah-ha moment for me when I was going through the photos for inspiration. I even found a piece flat enough to stamp "LOVE" on it.

 Club Scrap papers, stamps, leaves and stencil. Thrift shop denim. Recollections burlap.
 Hobby Lobby driftwood. Queen&Co pearls. Sizzix die. EK Success punch.
Wedding photographs by Tammie Gilchrist.
 

I'm loving the stencil for this month. I love how the words interlock by just shifting the stencil a bit. Here's a tutorial for using it.  I figured out a way to stencil without stray inking. I use washi tape to cover holes and spaces I don't want to ink and use scratch paper on the edges. It takes me a little bit longer, but I've been really happy with the results.


I couldn't just stop with this layout but didn't want to be a blog hog ;).
Please join me next week for two more wood projects.
Thank you for joining us today. Please continue on to see what spectacular project Tina has created for you.

Thursday, September 22, 2016

Grow Love

One of my dear friends was married in a small ceremony on the coast. She shared some amazing photos by her photographer Tammie Gilchrist. The colors and softness of the photos work perfect with the Garden Shed collection.
 
The layout design is part of the ALSB (Assembly Line Scrapbooking) instructions provided with the kit with some minor adjustments. These designs allow for creative interpretation and personal embellishing.
CS papers, tags, stamps, stakes, buttons and stencil. Unknown twine.
 
 
Check back tomorrow for the Club Scrap Artist Team Challenge Blog Hop!


Wednesday, September 21, 2016

Garden of Friendship

Ah...Washi tape...how do I love thee?! Yep, I'm an addict. I can't resist a cute washi tape. I love the fact that you can add it to a layout or card like ribbon without it adding much bulk. But it has many other great values. Just Pinterest it. You'll see. Here I used the tape to cover some bright purple buttons. This wood washi tape is one of my favorites since I love being outdoors. I honestly don't know the makers of many of these tapes. I recently learned of an awesome idea from Arlene P: Write on the inside of the roll who makes it or from what collection its from. You should join the Stash Challenge over on the Club Scrap Forum and share your projects using washi.

Club Scrap papers, tag, ribbon and buttons. Darice embossing folder. Unknown Washi.
 
Tear washi into two pieces if one doesn't fit.
Fold over sides and trim closely to the back.
This keeps the washi tape from bunching at the sides.
Poke holes if you want to keep the button appearance.


Monday, September 19, 2016

Matt & Haley's Wedding

Here's a sweet digital layout using a Monthly Freebie template by Fiddle-Dee-Dee Designs. She just happens to be one of my favorite template makers ever and I love that she now offers a "Dressed Down" version. I seriously have over 200 of her templates! I usually do some sort of altering with most templates to make my photos the highlight of the page.
 
This layout is using her September free template. That combined with the Garden Shed digital collection and a little tweaking of colors I came up with this wonderful layout documenting Matthew and Haley's wedding that I was unable to attend. I'm sure you've noticed that I'm not much into journaling (gasp) so I am very thankful for tags!


Friday, September 16, 2016

Serenity

Happy Friday!
 
September's technique challenge over at Club Scrap is to use a sketch as inspiration for a different project. For example, use a card sketch to create a layout or layout sketch for a card. That's double the inspiration!
 
 
For this layout I used the above sketch with some minor adjustments. Instead of a large mat I stamped a border around the edges with the thyme stamp, using a post-it note to mask the edges.
 
 
I colored the wooden plant stakes with distress ink and stamped my title with Stazon ink.

 
With a craft knife I cut the garden trowel so the tag would slide in underneath.
Stamped, colored and cut a water can. Adhered with dimensional squares.
 
 
The layout wasn't complete without these adorable little bees!
 

Have a fabulous weekend!


Wednesday, September 14, 2016

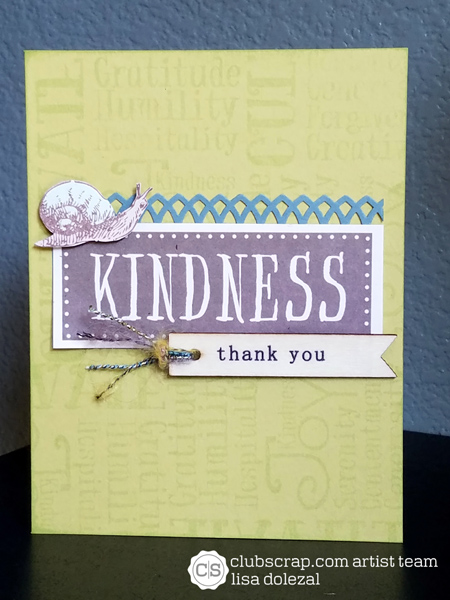
Kindness

I was playing with the background stamps from Garden Shed and scrap-lifted Julie's idea for the background of this card. I used a very light green ink instead of a watermark ink to keep the focus on the elements. I think this adorable little snail is my favorite from this collection.  I was inspired by Fusion's card challenge for the sketch of this card and hit the jackpot as the colors match perfectly!
 
Club Scrap papers, tags, stamps and fiber. Copic markers. Martha Stewart punch.
 

Tuesday, September 13, 2016

Let's Get Outdoorsy

Don't you just love it when you discover something by accident?! I had these horrendously neon green doilies in my stash that I just couldn't throw away. I dropped one on the floor with it landing upside down. The backside color matched almost exactly with the mint green in this month's Garden Shed collection! 
 
Paper Smooches is hosting an "Everything Goes" Challenge and thought this card would be perfect.
 

Club Scrap papers, ribbon, tag, wired stamp and charm. Paper Smooches quote.


Club Scrap September Card Sketch challenge


Monday, September 12, 2016

What's the Buzz?

 Last month I did a blog post for Club Scrap on using your stencils to emboss paper.
I forgot to share that technique here as well. 
 
Club Scrap papers, stamp, ribbon, charm, tag and stencil. Copics.
 
I wanted a honeycomb background for this card but don't have an embossing folder or stamp that come close.
I do however have a honeycomb stencil from Club Scrap.
 
Here's the layering order:
Clear plate
Two rubber mats
Paper
Stencil
Clear Plate


Now you have another use for your stencils!
Enjoy!

Thursday, September 8, 2016

How to Plant a Garden

I love collage stamps!  I love the look of different layers and the opportunity to use different colors with one stamp. So I was very excited to see one included in the Garden Shed Jumbo stamps. I also like how you can use this bigger panel to cover the surface of smaller cards. Pan Pastels are a perfect art medium to use with these stamps. You can blend and shade different portions of the image.
This card was created using the Can You Case It? sketch.
Club Scrap papers, stamps. K&Co. butterfly. Pan Pastel. Cuttlebug embossing folder.


Wednesday, September 7, 2016

You'll dig out

Mojo Monday is hosting a sketch challenge that works perfectly for the tags and embellishments supplied in this kit.
I can't help but use this Darice embossing folder with the Garden Shed Greetings to Go kit! 
I really should broaden my horizons but it's just too stinkin' cute!


Tuesday, September 6, 2016

Garden Shed Color Challenge

This magnificent Garden Shed kit arrived Saturday and I had to dive right into the Greetings to Go pack. I love the double Z fold cards! So much artistic potential. The fact that they come pre-cut with detailed folding instructions is a huge bonus! I fought with the ones I created from scratch.
 
Cupcake Inspirations is hosting a color challenge using mint, poppy and kraft, which mostly the colors of this kit. I love how the poppy pops off the card! 

Club Scrap papers, tags and ribbon. Tim Holtz die cut. Darice embossing folder. 


Monday, September 5, 2016

Cultivate

Happy Labor Day!
 
I am loving this Garden Shed collection! I've been practicing with techniques learned at Scrapaneers by creating my own overlays, flair, shadowing and using blending modes. The new style of digital kits provided by Club Scrap has forced me to be more creative with the elements. I am totally thrilled on how this layout turned out! 
 
My paper Garden Shed kit arrived Saturday. The stamps have been cut and Mount It applied. I hope to get messy today with ink and not just BBQ sauce :)
 
Scrapaneers template, CS digital elements. 

Friday, September 2, 2016

My Garden of Friendship

Happy Friday!
 
 
Yesterday was the big release of the Garden Shed collection at Club Scrap. What a gorgeous kit! So while I'm waiting for my paper kit arrive, I'm playing with the digital kit. I created a few frames from the tags and created the glass bubble flair with some of the images. Those adorable bees are my new favorite embellishment!
Club Scrap digital items with Anna Aspnes texture brushes.