Showing posts with label Greetings to Go. Show all posts

Wednesday, February 28, 2018

Out with the New

The masculine colors and feel to these Steamworks Greetings to Go cards had me digging through my specialty papers to find something rugged.  These handmade brown toned marbled papers are the just the perfect addition.  
Opened card with a double z fold


Wednesday, January 3, 2018

Twine-Tags-Trees

Just Add Ink is hosting a Twine-Tags-Trees challenge which caught my interest. I just happen to love all three so this was an easy one for me. 
 
My New Year's crafty resolution is to use neglected tools.  I have at least a dozen unopened card kits that need to be completed so I just reached into the bin and plucked one out. I used a very neglected stencil with oxide inks to created the background. To continue using neglected items, I chose this berry branch die purchased at a recent Scrapbook Expo but never used.

How cute is little mini book on the front of the card?!  The inside of the main card says "Safe Travels".  You'll be seeing more from Literature collection. I was on a roll and created several cards with stencils never before used. Totally exciting!

Club Scrap papers, tags, tree charm and stencil. Oxide inks. Elizabeth Craft Designs die. American Craft twine.


Wednesday, November 22, 2017

Be Thankful

This month's Trattoria Greetings to Go collection has some uniquely folded bridge cards and they actually took me a bit to figure out how they were to be mailed. By just tilting the strip to one side the card will lay flat to 4.25x5.5. Adorable! You can see the original designs on this blog post.

Club Scrap papers, stamps and ribbon. Sizzix embossing folder. Technique Tuesday sentiment. Unknown washi tape. 

Friday, August 25, 2017

U R AMZNG

Welcome back for more Gelli Plate inspiration.  I created soooo many panels that I wanted to share more cards with you.  If you missed the initial post and directions you can find them here.


I love how these art panels require little embellishing.  They should be allowed to steal the show.

Monday, July 10, 2017

Frame It

Happy Monday!  I'm on the road this week so you'll have to wait a tad bit longer for some Vintage Botany craftiness. So I'm completing some of July's challenges with the Literature Greetings To Go kit. This month's NBUS (Never Been Used Stuff) challenge is to create a frame with stamps.  I'm not the best stamper so a Misti is a must for me. With a little practice and masking this frame turned out much better than expected. :)


Friday, June 16, 2017

Pattern Play Double Z

Yesterday's blog debuted the fun double Z fold card in this month's Pattern Play's Greeting to Go. I really fell in love with how these cards open to reveal a surprise greeting. This "Hello" is one of my favorites.  I just love how this first panel only displays the "hello" tag but when you open the card you see the "What's up" tag.  Now this design is straight from the instructions that come with the Greetings to Go. However I was inspired by the fabric print in the photo from the Card Concepts #75 Challenge and used a laser die cut panel on the front of the card. I purchased a whole pad of these laser die cuts on clearance.  Super bang for my buck!   
 
Club Scrap papers, tags, ribbon, eyelet and acrylic dots. Recollections laser paper.


Thursday, June 15, 2017

Proud of You!

The Pattern Play's Greetings to Go comes with double Z fold cards. Both the top panel and the card base are folded in a Z and can reveal a fun hidden greeting. Tricia has made a video if you need some help getting the concept or putting these cards together.
 
June's NBUS (Never Been Used Stuff) challenge is to use your large pattern stamps to create a background. For me this is much easier done with a Misti, which is always close by. I chose the background stamp from Graffiti,  which reminds me of the spray webbing I've been using to create many backgrounds with the Pattern Play collection.  
Club Scrap papers, tag, stamp and ribbon. Recollections feather. Pretty Pink Posh sequins. Doodlebug Designs doily.
Top view of card open. 


Friday, June 9, 2017

Pattern Play Webbing

Before Pattern Play even hit my doorstep I was creating some background panels in preparation. It's been awhile since I've played with my webbing spray, so it was time to get messy. I actually spray panels inside my outdoor garbage can so there really isn't any mess for me.  If not, I do recommend lots of newspaper and spraying outdoors is a must.  

You can get some great designs with using a light spray, heavy spray or spray at an angle. I think the one on the left looks like jellyfish.
Here are the cards created with some of the panels. I used various tags and elements from the Pattern Play Greetings to Go kit and the Deluxe Collection.


Tuesday, May 9, 2017

Canoe Hear Me Now?

Canoe hear me now? OMG love, love, love this quote! I thought I'd share more gate cards but using burlap I had on hand. This burlap does not have a backing and will unravel if cut.  I coated the back with bookbinding glue and let dry. You can now even die cut these pieces till your hearts content. They give a great rustic feel to your masculine cards.
1. Stamp ducks on kraft and fussy cut.
2. Adhere burlap to each side.
3. Adhere ribbon and greeting.
4. Adhere only part of duck to one side. Adhere only part of duck to other side.
Club Scrap papers, stamps and tags. Woodpile Fun trees. 


Monday, May 8, 2017

Adirondacks Gate Cards

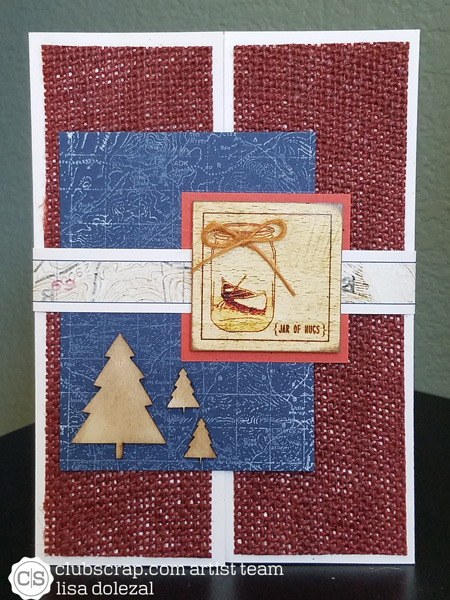
I like the variety these gate cards provide in greeting cards. They allow for interactive opening pieces, belly bands and other fun embellishing. You do however have to make a conscious effort to not add adhesive to the whole object if it lies between the seam of the card. I love the burlap sheet provided in the Adirondacks Greetings to Go.
 
This card has the frame attached to left side and the tag/greeting attached on the right side.
 

This card has the blue mat and feather attached to the left side.
The belly band slides over the card and rests midway.
The greeting and fibers are attached to the band.


Wednesday, April 12, 2017

Every Heart has a Story to Tell

Back in January on a rainy day I made paper with my recycled envelopes from Christmas greetings. I only added a small amount of red paper bits  to the blender in some instances to get a soft pink with red flakes.  I didn't know it then but those papers would match perfectly with the Cherry Blossoms collection.
 
 
I learned a neat trick from Karen for cutting your handmade paper but leaving a torn edge look by using a water brush and ruler.
You'll be seeing these handmade papers frequently this month.
 
 
The following card was created using the Cherry Blossoms Greetings to Go kit along with inspiration from the April Sketch Challenge.

 Club Scrap papers, tags, and white flower. Close to My Heart fiber. Prima flowers. Cuttlebug embossing folder. Nuvo crystal drops.
 
Need further instructions on making paper?
I go more in depth in my Handmade Paper blog post.

Wednesday, April 5, 2017

Library Pockets

While going through my stash I came across these library pockets. These unusual embellishments are great for layouts and cards.  I adapted these pockets and cards from the Literature Greetings to Go to fit certain upcoming birthdays. I used my alphabet and number stencils on the pockets to personalize.
Club Scrap papers, cards, ribbon and stencil. Sizzix star die and embossing folder. Unknown clip. 
Hidden portion of card. 
Club Scrap papers, ribbons, button, stencil, pocket and card. Sizzix heart die and embossing folder. 


The Literature Greetings to Go kit and the Alphabet stencils are at rock bottom sale prices right now!


Thursday, March 16, 2017

Happy Easter

 I could swear we just had Christmas! Is it really Easter time already?!
 
Creative with Stamps is hosing an Easter challenge and the new Delft Collection has perfect colors.  
 If you'd like to see how I made the tiles you can view this Faux Tile blog post.

Club Scrap papers, thread and stamps. Recycled flower. Unknown wooden bird embellishment.


Tuesday, March 14, 2017

Faux Tiles

I have been having a blast creating tiles for the new Delft collection. I'm generally not a fan of the color blue, only because I wear blue for work...for the last 25+ years.  I however love this shade of blue especially with the pop of yellow. You'll be seeing yellow flowers on most of my projects this month. I actually used them around the house for décor and needed a change.  They ended up in my craft stash and am happy to report that they've all been recycled!
 
So to create the tiles I went waaaay back in my stash to use up some perforated pages that came in the Sunken Treasures 2001 collection. They are 8 1/2 x 5 1/2 and already perforated into small squares.

 I stamped the tile stamp repeatedly on the page making sure to go off the edges.
Slightly bend the paper on the perforations and ink the edges.
I got carried away with the bending and some rows came off. 
Ink paper with clear embossing ink, sprinkle Ultra Thick Embossing powder and heat set.

 
Here's just a few samples using the Delft Greetings to Go with the tiles.


Tuesday, March 7, 2017

Coffee Break Part II

Welcome back for a few more Coffee Break cards. They really were fun to put together. So simple and easy.
All I really did was add a few embellishments to enhance the cut aparts with glossy accents, buttons or charms.


Ranger Sepia Glossy Accents used to color coffee.
 

Club Scrap papers, tags, ribbon and button. Nuvo Drops.