Monday, February 29, 2016

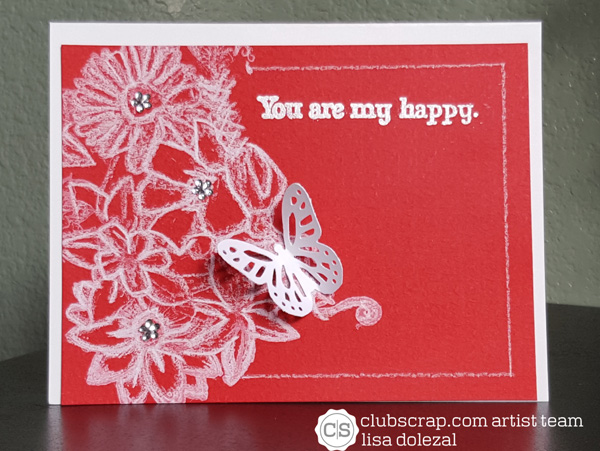
White Weathered Florals

Welcome to the Club Scrap Artist Team challenge!  This month we all received the Weathered Florals unmounted stamps to create with. Believe it or not, I did not already have this collection ;-) I know, shocking.


If you've arrived here from the very talented Donna you're in the right spot or you can start from the beginning at Club Scrap.

I came across this white pencil highlighting technique while watching Jennifer McGuire YouTube videos. I really like this one because I could stamp the image and take the panels on the go and finish up elsewhere. 

Stamp the panel with white ink and heat set.

Shade in the images with a white pencil to your liking. Make sure to sharpen pencil often.

Stamp sentiment and emboss with white embossing powder. I just kept it simple to let the art work speak for itself. 

I couldn't help it...I really liked this technique so I created one in red as well. 


Using my grid ruler I added borders along the sides.


While I was embossing with the white powder, I really loved the look of white on the red card stock and started playing with the images.  The red flowers really took my breath away.  I stamped and embossed several flowers and cut different layers to give dimension. 


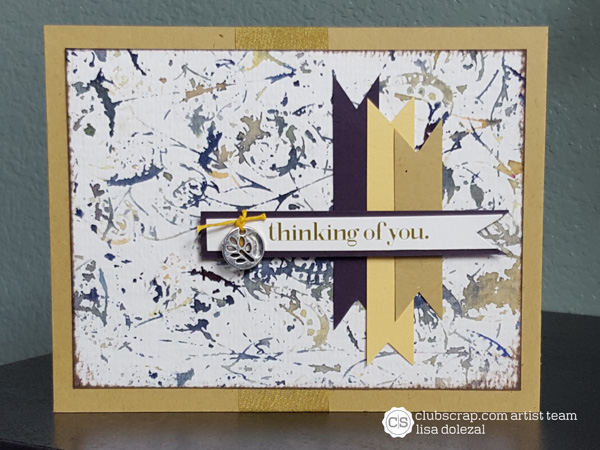
This next card I used the lines to create my own plaid look. I originally tried several panels with purples, grays and red and they just didn't look right. I think softer colors work better. I also kept embellishments to minimum since the background is heavy. 

Club Scrap papers, stamp and wooden title. Dazzles stickers.

Thanks for joining us today.  Please continue on to see what the amazing Roni has in store for you

Friday, February 26, 2016

Special Moments Sketch

I created a whole assortment of Color Burst backgrounds the other day.  I was experimenting in different techniques and watching the colors interact with different mediums and applying them in different ways.   Here I puffed the powder on watercolor paper and added a little bit of water, just to get the ink to run. Dried with my heat gun. I really like how some of the powder was so condensed that it looks black and silver. Speaking of silver...I CANNOT wait to get my hands on the metallic Color Bursts!

Club Scrap papers, envelope, tag, ribbon and stamps. Queen & Co. pearls. Ken Oliver Color Bursts.
 

Sketch used for the Retro Sketch #203 Challenge.


Thursday, February 25, 2016

Spring Time

The recent color challenge at Cupcake Inspirations makes me dream of spring. I love the bright greens and blues!  Here's my take on that challenge using the sketch from Can You Case It?
 
The background panel was created with color bursts and a water resist technique used in yesterday's blog hop. I then stamped on the ribbon which is why it's a little fuzzy.
Club Scrap papers, stamps and button. Ken Oliver's Color Bursts. American Craft ribbon. Recollections crochet embellishment. Cuttlebug embossing folder. Queen & Co pearls.


Wednesday, February 24, 2016

Crewel & Unusual Color Bursts

Welcome to the Crewel & Unusual Blog Hop!  If  you've arrived here from the talented Anne Marie you're in the right spot.  If you are starting here and are looking to join us from the beginning head to Club Scrap and see what Karen has created for you.


Today we're creating with this month's Crewel & Unusual collection. My intention was to get all crafty, sew and stitch on layouts and cards.  That didn't happen.  My craft room is getting new flooring which put ALL my supplies and work surfaces in the dining room. So, I could really only work in the kitchen.  The kitchen is usually where I work with all the messy art supplies, so here we are: Color Bursts.
I started out by adding Color Burst powders to a dry watercolor paper panel then added water and watched the magic begin. I then stamped a clean stamp on to the wet panel picking up inks and stamping on to a dry panel.  The wet panel acts as a stamp pad. 

Continue to stamp repeatedly until a desired effect. 
I then dried the color burst panel with my heat gun. Spray a stamp with water and stamp on the dry colored panel. 
Watch as more magic happens! These Color Bursts are just amazing!

Here are some examples of cards made with these panels and the Greetings to Go kit. 


My favorite part of this kit is the kraft bobbin and the "This is sew crazy" quote!  I've used it many times already on cards, it's just too cute! 


While I was shopping doing research at Micheal's I came across these wooden bobbins and crochet embellishments on clearance and just had to buy them! 


Thanks for hoping by.  Please continue on to see what Donna has created next.

Tuesday, February 23, 2016

Best Memories

I'm still playing with my digital kits while my craft room is torn up waiting for new floors.
Here's some photos from the tour of Lambeau, which I'm pretty sure we could start guiding ;-

Club Scrap overlay, title and frame. 

Thought I'd throw in a little tease for tomorrow's Blog Hop.  Make sure you return to see what goodies everyone's created!

Monday, February 22, 2016

Fly Above the Waves

I was playing with Photoshop the other night, blending different photos with papers. I absolutely love how the cream digital paper from Crewel & Unusual  blended with a photo to make the background look like canvas.  Since I really love the background, I kept the photos and embellishments to a minimum. The frame and border actually comes as one layer so I didn't have to do much but add a photo and find the perfect sentiment. Easy peasy! This is definitely a print worthy digital page!

Club Scrap digital papers, stamps and embellishments.

I've had several questions regarding printing digital pages. I don't print out many of them, just my favorites. I've only used Persnickety Prints for my 12x12 pages. I really like the quality of the printing and papers. I usually add a few of them to an order of 4x6s to save on shipping. A few times a year they have a sale costing $1.49 per 12x12 print. I have a photo stand I bought at Michael's that I keep in our entryway. I change the displayed pages regularly. Some of the pages I use for the title and/or end page of an album. Many of the digital pages end up as my computer background or screen saver slide show.

Have a fabulous week!

Friday, February 19, 2016

Bar Harbor

Happy Friday!

I'm chugging along on with my layouts. We're slowly working our way down the East Coast in this layout. While in Bar Harbor we visited a lobster hatchery owned by the cutest couple. The Oceanarium was one of the highlights of our trip. We learned waaaaay more about lobsters than we thought possible. We got recommendations for the best lobster lunch from Mr. Mills while visiting his place, which didn't disappoint.  I couldn't stop looking around at the scenery. I finally got to see my fall foliage this year!
 
Club Scrap papers, tags and ribbon. Cricut lobsters. Washi tape. Recollections brads. Memorabilia. 

Thursday, February 18, 2016

Travel Far

Happy Thursday! Time for a layout.  I'm trying to get the vacation photos wrapped up.  Here's a layout using charms I bought at a little store at Peggy's Cove. When I'm on vacation, the only souvenirs I buy are what I put in my scrapbook.  I look for interesting patches, charms and pins. I tend to eat and drink my way through counties. Our motto is: Travel far. Eat well. Live long.

I couldn't help but use up the last bit of my Cape Cod papers, one of my favorite kits. I'm a sucker for lighthouses. 

Club Scrap papers and stamps. American Crafts stickers. 

Wednesday, February 17, 2016

Position it! Stamping

Several years back at Club Scrap retreat, Tricia introduced us to a stamping tool that until recently I forgot I had.  It's called the Position it! What I remember most about this tool was Tricia saying "Don't google Position it!  All kinds of websites pop up." So I was actually scared to google that when I rediscovered this tool.  I did find the directions and YouTube video instruction so I was relieved.  I forgot what an amazing tool this was and have been using it religiously to get my stamping straight. It does take some practice to get the hang of it and make it worth your while. I hate when I screw up the last bit of my card by stamping the sentiment crooked. Although this one has been discontinued, there are many similar ones out there. 
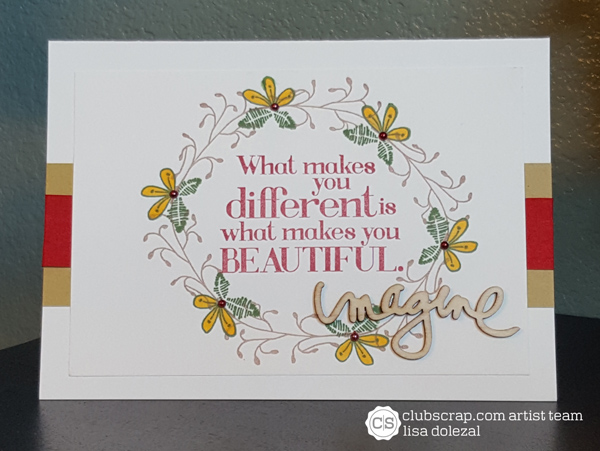
What I really loved about this tool was the ability to add straight borders with one small stamps or created circles, ovals and a patterns. The little sprig stamp from Crewel & Unusual got my attention and thought that would make a great wreath with a quote in the center.  

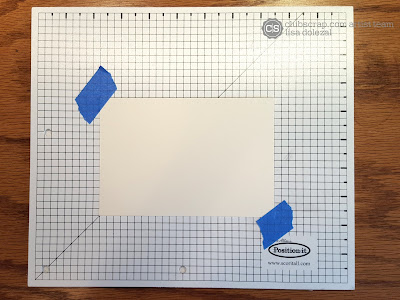
 Start by securing your panel to the Position It! base.
 
 Stamp your image on the clear plastic panel snug against the "L" shaped tool. 
 This will allow you to line up your image anywhere. 

 Place the clear plastic on your paper where you want your image.
Line up your black "L" shaped snug to the corner.
Remove plastic and stamp.
 
 Here I have one last image to stamp to complete my wreath. You can see the image on the plastic

Here is how the stamping block fits snugly in the "L". Of course you would remove the plastic before stamping final image.
 Completed wreath. 
 I added some flowers and colored with Copics.
I even stamped the quote on the clear plastic and lined it up so that I would get it centered.
Club Scrap papers, stamps, ribbon and wooden word. Queen & Co. pearls.


I wanted to let my wreath take center stage and speak for itself. I kept the background and embellishments simple.

The design was inspired by this weeks Tuesday Morning Sketch challenge.


Tuesday, February 16, 2016

This is Sew Crazy!

My favorite stamps from the Crewel & Unusual jumbo unmounted stamp set! 


I did double duty for this card with the Club Scrap NBUS (New but Unused Stamp) challenge and the Can You Case It? challenge using purple, kraft and white. 


I used the Club Scrap Navajo stitching stamp with the new Crewel & Unusual kit. I couldn't resist using the "This is Sew Crazy" stamp with the kraft bobbin! to coordinate with the Can You Case It? challenge. I added white twine to the bobbin and hand dyed the tassel with violet Color Burst.

       Just a side note...the Color Burst came off my granite counter tops, but not the tassel or my hands ;-)


Monday, February 15, 2016

Tape Stamping

Every month Club Scrap challenges us with a different crafting technique. For February's technique Roni shares with us how to stamp with tape. Who knew there were so many ways!?

I'm always up for a new, fun challenge.  Here I'm using the new Crewel & Unusual Greetings to Go kit.  This kit has three sets of cards with two of them having some fun folds.  They are difficult to photograph, so they do look a little bit "off".  

I started off by stacking my two purple panels on top of each other, as they would on the card. Inked up my painters tape with white ink and then stamped the tape on the panels. Re-ink the tape and stamp three rows. 


Decorated with included ribbon and tags, 


This next card I taped off one section that I was going to use for my sentiment and stamped around it. 
I even went a little further and stamped many heart images in watermark ink, using post-it notes to mask the stamped images and created different stamped layers. 

I then colored the images using my Pan Pastels 


Adhered red ribbon to one side of the gate fold and three red heart brads randomly. Stamp sentiment. 

I did a similar technique for the last card. I taped the outside edges of the panel and stamped the inside section. I first splattered some Color Bursts and stamped a background dotted image. Removed the tape and stamped my three flowers. Stamped right gate fold with border. Adhered tag and ribbon. 


You should give tape a try in your next stamping project!
 Don't forget to share your creation and link up with us over at Club Scrap for a gift certificate!

Sunday, February 14, 2016

Happy Valentine's Day!

Happy Valentine's Day!
 
 
Club Scrap digital papers, stitching, embellishments. Dream Big Designs brush.